diumenge, 15 de desembre del 2013

Festivalet 2013


[ENG] This weekend there's been the Festivalet market at the Museu Marítim de Barcelona. Bigger space, more shops...a lot of people. As always.
I've seen lots of things. Cool things. Really cool things and things already seen. But if its the first time you go there, you'll have a good time.
[CAT] Aquest cap de setmana s'ha tornar a celebrar el Festivalet. Aquest cop al Museu Marítim de Barcelona. Molt més espai, moltes més parades...molta gent. Com sempre.
He vist de tot. Coses guais, coses molt guais i coses ja vistes. Però si algú hi va per primera vegada, segur que ho gaudirà.
I com a mostra, algunes fotos que he fet avui...


dissabte, 14 de desembre del 2013

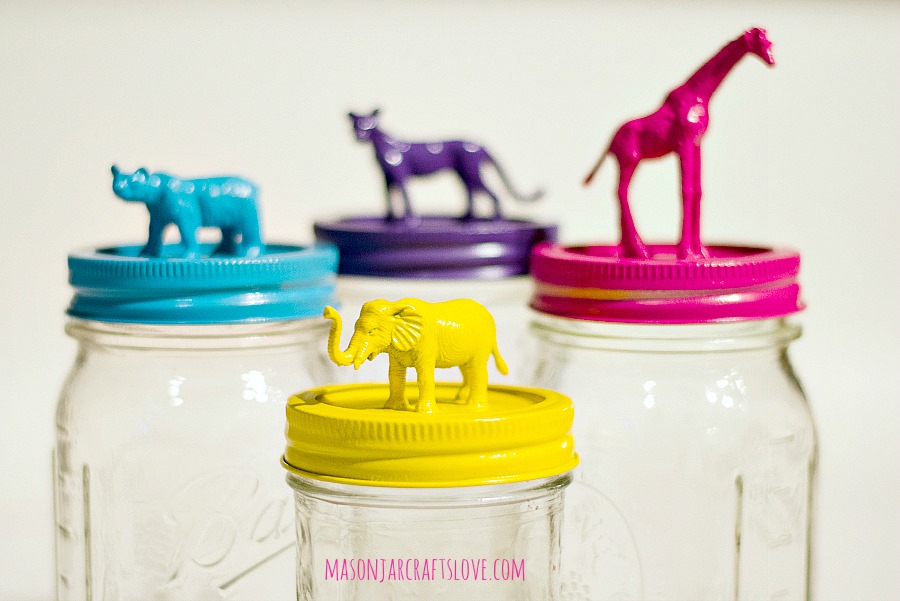
DIY: Animal Topped Mason Jar


[ENG] I don't know about you, but my house is filled with mason jars amongst other things, and I've always solved the problem of "what do I do with these" with my mum and her jams. The thing is that she has a lot of them and doesn't really want them anymore and it breaks my heart to think I cannot do anything with them. Sad, isn't it?
Well, recently I discoverd Linda's blog Mason Jar Crafts Love, and as you might imagine is everything (everything!!!) related to mason jars and DIY. Crazy. And I saw this tutorial and I think is a great way to reuse the mason jars and a great gift for christmas.
You will need.
  • Mason jars
  • Super glue
  • Plastic animals
  • Spray paint
To do it you will have to:
  1. Glue animals feet to tops of lids. Let it dry completely.
  2. Spray paint animals and lids together. Two coats would be perfect.
  3. Let it dry completely.
If you want, you can glue a plastic band inside at the start.

[CAT] No sé vosaltres, però casa meva està plena de pots de vidre de conserva. Sempre he solucionat el problema de "què faig amb això" donant-los a ma mare perquè pogués fer mermelades però ara fins i tot a ella li surten per les orelles i ja no en vol més i em trenca el cor pensar que no puc fer res amb ells.Trist, no?

Doncs bé, fa poc vaig descobrir el blog de la Linda,Mason Jar Crafts Love, i com podeu imaginar va tot (tot!!) sobre pots de conserva i què fer amb ells amb DIY. Flipant. I vaig trobar aquest tutorial que penso és genial per fer regals ara que ve nada.
Necessitareu:
  • Pots de conserva
  • Animalets de plàstic
  • Super glue
  • Pintura en spray
I per fer-los:
  1. Enganxa els peus dels animals a la tapa. Deixa assecar del tot.
  2. Pinta les figures i les tapes amb l'esprai tot alhora.
  3. Deixa assecar del tot.
Si vols, li pots afegir una arandela de plàstic dins per fer-lo més hermètic.


dimarts, 10 de desembre del 2013

Pleased to Meet You, Ingela P. Arrhenius


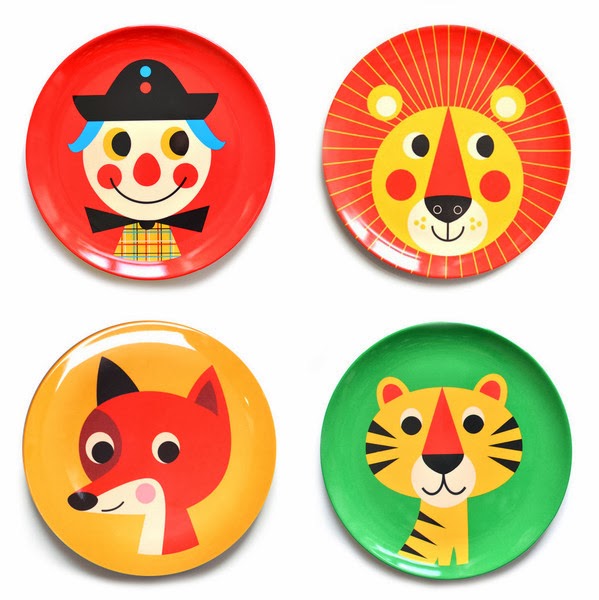
[ENG] A long time since my last Pleased to Meet You, so today I bring you this absolutely fabulous swedish illustator influenced by the design of the 50's and 60's, Ingela P. Arrhenius. I absolutely adore her work and everything she does. 
My interest on her started when I saw her crazy animal matrioskas but later I discovered her plates, prints, postcards (I have one as a birthday postcard, lucky me!), 2D-puzzles, infant books...everything.
I WANT EVERYTHING!!
So I'd better start saving some money because I really want to have some of her work home. And if you want it too, you can find it at OMM Design or at Lagom Design.
Pleased to Meet You Ingela.
[CAT] Molt de temps (massa potser) des de l'últim Pleased to Meet You, així que avui us duc a una brillant il·lustradora sueca molt influenciada per les dècades dels 50 i 60, Ingela P. Arrhenius. Em flipa absolutament tot el que fa. 
Em va cridar l'atenció la primera vegada que vaig veure les seves matrioskes particulars i més tard va seguir al descobrir els plats, les postals (tengui!), els puzzles, els llibres infantils...
I és que HO VULL TOT!
Així que de moment més em val començar a estalviar una micona per poder fer-me amb algún dels seus tresors. I si vosaltres també en voleu la podeu trobar a OMM Design o aLagom Design.
Pleased to Meet You Ingela.


dissabte, 7 de desembre del 2013

My very first amigurumi pattern... Mac, Mec...Mic!


[ENG] I was thinking about the Christmas presents a while ago and I decided I wanted to crochet a famous tv character here in Catalunya, Mic. The thing is that I thought I would find a pattern on the internet but...oh, horror, I couldn't find any. After a while I checked again...and nothing. So finally I decided to design my very first amigurumi pattern, thinking it wouldn't be that hard...well, it wasn't that hard but it took my quite a lot of time, specially to write the pattern down and to find the perfect dimentions. 
And I feel happy and proud of myself and I've decided to share my pattern with you (under a Creative Commons License; please see terms here).
If you ever try to do it will you please, please, please, mention me as the designer (wow, how I like the sound of it)? Thank you!
And if you have any questions, don't hesitate to ask!


[CAT] Ja fa un temps que li donava voltes al tema dels regals de reis i vaig pensar que un Mic de
ganxet seria genial, així que sense perdre el temps em vaig posar a buscar un patró per la xarxa i...oh horror, no n'hi ha (o si més no jo no l'he sabut trobar)!!! Per un temps vaig esperar si algú en feia algún però res de res, alguna foto del mestre en qüestió però sense patró (en podeu trobar a L'atelier de l'Obi o a  Ganxetades per exemple).

Total, que fa un parell de setmanes vaig decidir liar-me la manta al cap i intentar fer-lo jo soleta de zero. Pensava que només son boles i cilindres, que no seria tant complicat...i bé, tot i que no és mooooolt complicat m'ha costat força però estic suuuuuuuuper contenta amb el resultat. S'hi assembla i tot!!
I com estic tant contenta, aquí us deixo el meu patró (deixo que em tireu floretes...i critiques!!). El patró està sota una llicència de Creative Commons, així que mira les condicions per poder citar-me correctament.
Per cert, si alguna ànima es deixa caure per aquí i mai vol fer-lo i en parla en algún blog...podríeu dir que la mare inicial de l'orgullosa criatura sóc jo?? Gràcies!!!

Abbreviations / Abreviacions
ch = chain; cadeneta
st = stitch or stitches; punts
sc = single crochet (US), double crochet (UK); punt baix
dc = double crochet (US), treble (UK); punt alt
ss = slip stitch; punt nan
inc = increase; incrementar
inc 2 = increase by working 2 sc into one st; incrementar 2 punts en un punt
dec = decrease; disminuïr
dec 2 = decrease 2 st down to one, disminuïr 2 punts a un.
FO = finish off; tancar

Head/ Cap                                             Nose/ Nas
Orange yarn / Llana taronja                   Red yarn/ llana vermella
1. 6sc into magic ring                           1. 6sc into magic ring
2. 2sc into each st (12)                         2. 2sc into each st (12)
3. [1 sc, inc 2] x 6 (18)                          3. [1 sc, inc 2] x 6 (18)
4. [2sc, inc 2] x 6 (24)                           4. [2sc, inc 2] x 6 (24)
5. [3sc, inc 2] x 6 (30)                           5-6: work 24 sc for 2 rounds
6. [4sc, inc 2] x 6 (36)                           7. [2sc, dec 2] x 6 (18)
7. [5sc, inc 2] x 6 (42)                           8. [1 sc, dec 2] x 6 (12)
8. [6sc, inc2] x 6 (48)                            9. [dec 2] x 6 (6)
9-15: work 48 sc for 7 rounds               10. FO
16. [6sc, dec 2] x 6 (42)
17. [5sc, dec 2] x 6 (36)
18. [4 sc, dec 2] x 6 (30)
19. [3sc, dec 2] x 6 (24)
20. [2sc, dec 2] x 6 (18)
21. [1 sc, dec 2] x 6 (12)
22. [dec 2] x 6 (6)
23. FO

Ears / orelles                                     Eyes/ Ulls:
Green yarn / llana verda                    White yarn/ llana blanca
1. 6sc into magic ring                        1. 6sc into magic ring
2. 2sc into each st (12)                      2. 2sc into each st (12)
3. 8 sc, [2 dc in next sc] x 4 (16)        3. [1 sc, inc 2] x 6 (18)
4. 12 sc, [2 dc ] x 4 (20)                    Make two of these and join them together using a slip stitch.
5. work 20 sc for 1 round                   To fill the gap in between, 4 dc and then continue with single crochet
6. FO                                                 all along. When attached to head, add 2 safety eyes.

Body/ Cos                                            
Orange yarn / Llana taronja              
1. 6sc into magic ring                    20.[inc 2, 6 sc] x 6 (48)                 42. [1 dec, 1 sc] x 6 (12)
2. 2sc into each st (12)                 21-25. work 48 sc for 5 rounds.    43. [1 dec] x 6 (6)
3. [1 sc, inc 2] x 6 (18)                  26. [inc 2, 7 sc] x 6 (54)                 44. FO
4. [2sc, inc 2] x 6 (24)                   27-29. work 54 sc for 3 rounds.
5-6. work 24 sc for 2 rounds         30. [1 dec, 7sc] x 6 (48)
7. [inc 2, 11 sc] x 2 (26)                31-32. work 48 sc for 2 rounds.
8-9. work 26 sc for 2 rounds         33. [1 dec, 6 sc] x 6 (42)
10. [inc 2, 12 sc] x 2 (28)              34. work 42 sc for 1 round.
11. work 28 sc for 1 round           35. [1 dec, 5 sc] x 6 (36)
12. [inc 2, 6 sc] x 4 (32)                36. work 36 sc for 1 round
13.work 32 sc for 1 round            37. [1 dec, 4 sc] x 6 (30)
14. [inc 2, 7 sc] x 4 (36)                38. work 30 sc for 1 round
15-16. work 36 sc for 2 rounds    39. [1 dec, 3 sc] x 6 (24)
17. [inc 2, 5 sc] x 6 (42)                40. work 24 sc for 1 round
18-19. work 42 sc for 1 round      41. [1 dec, 2 sc] x 6 (18)

Arms/ Braços (x 2)
Start with green yarn/ Comença amb llana verda.
1. 6sc into magic ring                
2. 2sc into each st (12)            
3. [1 sc, inc 2] x 6 (18)
4-9. Work 18 sc for 6 rounds.
10. Change colour to yellow/ Canvi de color a groc
10-14. Work 18 sc for 5 rounds.
15. Change colour to orange/ Canvi de color a taronja.
15-42. Work 18 sc for 27 rounds.
43. [1 dec, 1sc] x 6 (12) (this will give the wrist shape). Start stuffing.
44.[1 sc, inc 2] x 6 (18)
45.[2sc, inc 2] x 6 (24)  
46*-53. Work 24 sc for 8 rounds.
54. [1 dec, 2 sc] x 6 (18)
55. [1 dec, 1 sc] x 6 (12)
56.  [1 dec] x 6 (6)
57. FO
*(at round 46 you must join the finger while you are crocheting/ afegeix el dit a la passada 46 mentre vas fent els punts)
Finger/Dit (x2)
1. 3 sc into magic ring
2. [2 sc, inc 2] x 1 (4)
3-4: work 4 sc for 2 rounds
5. [2 sc, 1 dec] x 1 (3)
6. [1 sc, 1 dec] x 1 (2)
7. FO

Legs/ cames (x 2)
Start with yellow (començar amb groc)
1. 6sc into magic ring                  
2. 2sc into each st (12)              
3. [1 sc, inc 2] x 6 (18)
4-10. work 18 sc for 7 rounds
11-18 change colour to orange (canvi a taronja); work 18 for 7 rounds
19-32. change to green (canvi a verd); work 18 for 14 rounds.
33-47. change colour to orange (canvi a taronja); work 18 for 14 rounds.
*
Boots/botes
White yarn/ Llana blanca
1. 6sc into magic ring                  
2. 2sc into each st (12)    
3. [2 inc next 2 st, 4sc] x 2 (16)
4. [2 inc next 4 st, 4 sc] x 2 (24)
5. [2 inc next 6 st, 6 sc] x 2 (36)
6. 4 sc, 4 dec, 28 sc (32)
7. 1 sc, 4 dec, 27 sc (28)
8. 6 dec, 16 sc (22)
9. 4 dec, 18 sc (18)
* join with the end of 47th round on leg.




dijous, 21 de novembre del 2013

Theo and Beau

[ENG] Today, while reading the newspaper, this wonderful pictures where part of them...Let me introduce you to Theo and Beau,  a lovely puppy and a gorgeous baby that have this amazing naps together. After realizing the connection between them, the mum started to take pictures of both of them while having the nap.
Isn't it amazing? 
You can follow this family at Momma's gone city...and back to California again and on instagram (#theoandbeau).
[CAT] Avui, tot llegint el diari, he trobat aquestes fotos fantàstiques com part d'una notícia...Us presento a en Theo  i a en Beau, un cadell preciós i un nen guapíssim. Després que la mare se n'adonés de la connexió entre els dos mentre feien la migdiada, va començar a fer-los fotos i aquí en teniu algunes fotos. 
Podeu seguir aquesta familia a  Momma's gone city...and back to California again i a instagram.


dissabte, 16 de novembre del 2013

Christmas DIY...Angel ornaments


[ENG] I guess its about time we start thinking about christmas, isn't it?
Last year I decided to do some crocheted christmas lights and this year I've just found the right thing to crochet, very easy and really nice.
 The plan is to crochet some angels thanks to this free pattern found on Raverly. You can put them on your tree, as part of some Christmas decoration or to give a final touch at your presents.
It's a good plan...
Nice and easy.

[CAT] Suposo que ja va tocant començar a pensar en el nadal, no?
L'any passat vaig decidir fer unes llums de nadal  de ganxet i aquest any tot just acabo de trobar el que seria perfecte i fàcil de fer.
Es tracta d'uns angels de ganxet i el patró gratuït el podeu trobar a Raverly. Els pots posar a l'arbre, per decorar la casa o per donar el punt final a un regal embolicat.
Pas mal, com dirien els francesos.
Pas mal...


dissabte, 19 d’octubre del 2013

DIY: Knot necklace


[ENG] I've been seeing this type of necklaces during the summer but I never bought one because I thought it shouldn't be that difficult to make, and I was right, although it takes quite a lot of time to make it. I did some research on the internet and I found a video explaining how to do it here and a post here.
You will need: 

  • 5 metres of rope
  • Metal clasps for necklaces
  • Superglue
  • Pins
  • Printed A4 pattern 
  • Porexpan
Step 1. Cut two strips of 2,5 meters; fix the pattern to the porexpan using some cellotape.
Step 2. The two lines from the patterns should be done separately. Pick one  and put your cord there (pay attention on how the cord goes (over or under) following the pattern and holding it with pins.
Step 3. One you finish one cord (check it is ok), you may start with the other one. Take you time....
Step 4. Remove all pins.
Step 5. Strech the cord from its ends and the centre until strengthened enough.
Step 6. Cut the cord to the size you need and glue the metal clasps at the ends.
[CAT] He estat veient aquests collarets per tot arreu durant aquest passat estiu, però mai me'l vaig acabar comprant perquè pensava que no hauria de ser gens difícil (ni car!!!), i tenia tota la raó, tot i que porta bastanta feineta. Després de buscar per internet vaig trobar un vídeo aquí i un post aquí.
Necessitareu:
  • 5 metres de corda
  • Tanques metàl·liques 
  • Superglue
  • Agulles
  • patró en A4
  • Porexpan
Pas 1. Talla dues tires de 2,5 metres; fixa el patró al damunt del porexpan amb cel·lo.
Pas 2. Les dues línees del patró s'han de fer per etapes. Escull-ne una i comença a resseguir la silueta amb la corda (en compte de veure si la corda va per sobre o per sota) i fixa-ho amb agulles.
Pas 3. Quan acabis amb la primera corda, segueix amb la segona. No vulguis córrer...
Pas 4. Treu les agulles.
Pas 5. Estira les cordes per les puntes fins que estigui prou apretat.
Pas 6. Talla la corda a la mida que vulguis i posa-hi les tanques amb superglue.


The pattern!

dissabte, 12 d’octubre del 2013

Pleased to Meet You: Kate Davies


[ENG] It's been a looooong time since the last Pleased to Meet You but today I bring you something I
discovered a long ago but as you see, I'm a little busy lately and I'm not posting that much...She is Kate Davies from Scotland and knits lovely stuff and the best is that you can buy her patterns is you are interested....
She describes herself as a person who enjoys designing knitwear (yes, she does!). Lucky us!
I really want to improve my knitting skills, because I'm in love with almost all her patterns.
You can buy her patterns here.

[CAT] Fa moltíssim temps des de l'últim Pleased to Meet You però avui us duc algo que crec que us agradarà i que fa temps que tinc, però com últimament he anat una mica liada doncs no he pogut publicar tant com voldria... Ella és Kate Davies, una noia escocesa que fa preciositats amb punt i el millor és que pots comprar els seus patrons per fer les teves peces.
Ella es descriu com a una persona que li agrada dissenyar roba de punt (i tant que li agrada!!). Afortunades nosaltres!
Realment tinc ganes de millorar les meves habilitats amb el punt, perquè m'agraden pràcticament tots els patrons que té.
Podeu comprar els seus patrons aquí.


sixareenfulllength

diumenge, 6 d’octubre del 2013

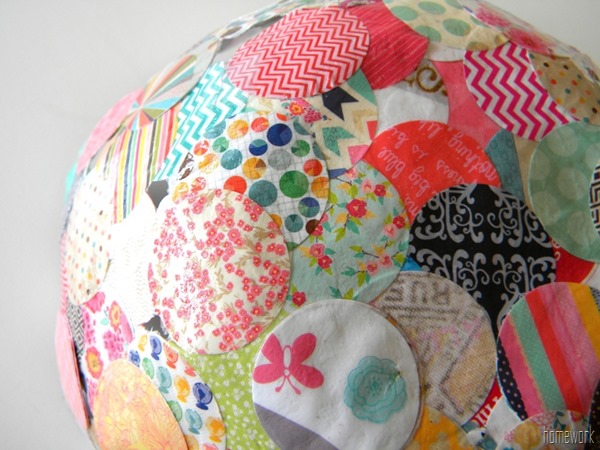
DIY: Paper Mache Confetti Bowl

Confetti Bowl 7
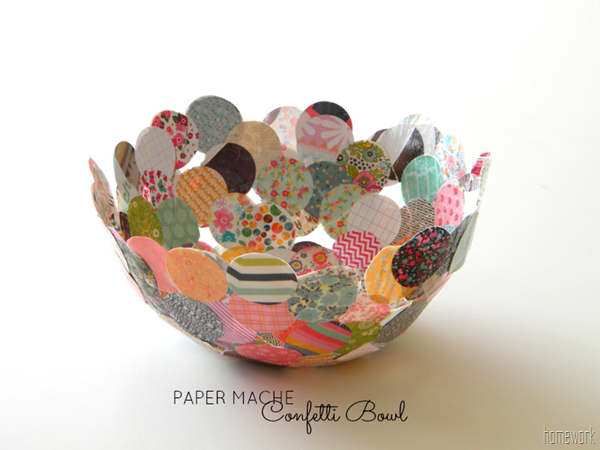
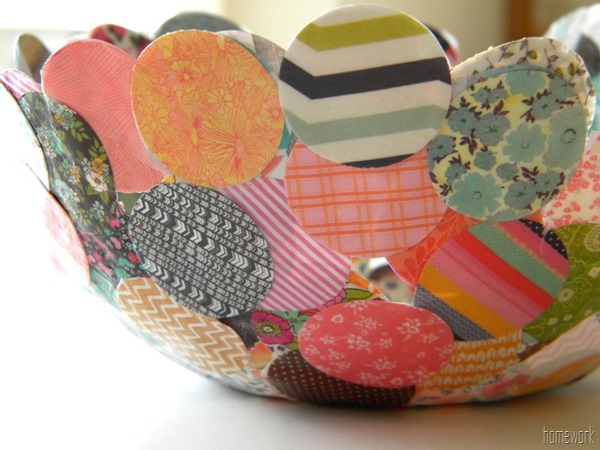
[ENG] You don't know what to do with those bits of paper you have left around the house but you are sure you don't want to throw them away?
Then there is a solution for that, and I just found it at Homework blog...a nice paper maché confetti bowl.

To make a confetti bowl, you'll need:

  • Paper scraps
  • 1 circle punch
  • paper maché paste (just wait, I'll explain the recipe now)
  • varnish

To prepare the paper maché paste: 
  • combine 0.5 cup flour and 2 cups cold water in a bowl.
  • Boil 2 cups of water in a sauce pan and add the flour and cold water mixture. Bring to boil again.
  • Remove from heat and add 3 tablespoons of sugar.
  • Let cool. The paste will thicken as it cools.

  • Once the paste is cool enough to work with, start adding your paper, you can use a round vase covered with plastic wrap to have the shape. Use a brush or even your fingers, it's cool!!!
  • Keep covering until happy with the shape. Once the paper maché is dry (several hours), carefully remove it from the form by gently peeling the plastic wrap away from the form.
  • To finish the confetti bowl, just give it two coats of varnish.
[CAT] No saps què fer amb aquells trocets de paper preciosos que et queden desperdigats per casa i tens clar que no els vols llançar? Doncs la solució és fàcil, i l'he trobada al blog Homework, fer un bol de paper maché amb confetti!!!

Per fer-lo necessitaràs:

  • Retalls de paper
  • 1 perforadora rodona ( que fagi confetti de mida prou raonable...)
  • pasta de paper maché (ara us dic com fer-la)
  • vernís

Per fer la pasta de paper maché:

  • barreja 0,5 tasses de farina amb 2 d'aigua freda a un bol.
  • vull 2 tasses d'aigua i afegeix la barreja anterior. Torna a bullir.
  • Treu del foc i afegeix 3 cullerades de sucre.
  • deixa refredar. La pasta agafarà consistència mentre refreda.

  • Un cop la pasta és prou freda, comença a forrar un vol rodó, prèviament protegit amb film de plàstic, amb els trocets de paper i la pasta (fes servir un pinzell o els dits, que no passa res!).
  • Ves cobrint fins que consideris que ja té la forma i la pinta que t'agrada. Quan el paper maché sigui sec (unes quantes hores després...), separa-ho lentament del film de plàstic.
  • Per acabar dona-li un parell de passades de vernís perquè quedi més protegit.
  • I au!


Related Posts Plugin for WordPress, Blogger...

Google Analytics